Lights: Westcott Flex 1×1′ Bi-Color LED Mat 2-Light Cine Travel Kit : https://www.amazon.com/dp/B00B77PSDE?tag=parkerwalbe01-20
Slider: Rhino Slider EVO Carbon 42″ https://rhinocameragear.com/collections/time-lapse-slider-bundle
To view all other equipment used in my videos click here: https://kit.com/parkerwalbeck
Welcome to yet another job shadow and behind the scenes where this time we have teamed up with Nuskin and are promoting their new toothpaste. Let’s jump right into it and give you an up close look at commercial I shot for them and the simplicity of it; even down to just TWO lights!
The whole idea behind this commercial was to inspire people to smile more in life, so the video was to be called “Choose to Smile” and the concept would be about bringing in “random” people (they were actually actors), interview them, asking them a set of questions that would bring out sad responses, and then ask a set of questions that would make them smile and laugh. A picture was taken at the end of each set of questions, we then compared the two photos side by side at the end to show how much of a difference it makes to smile.
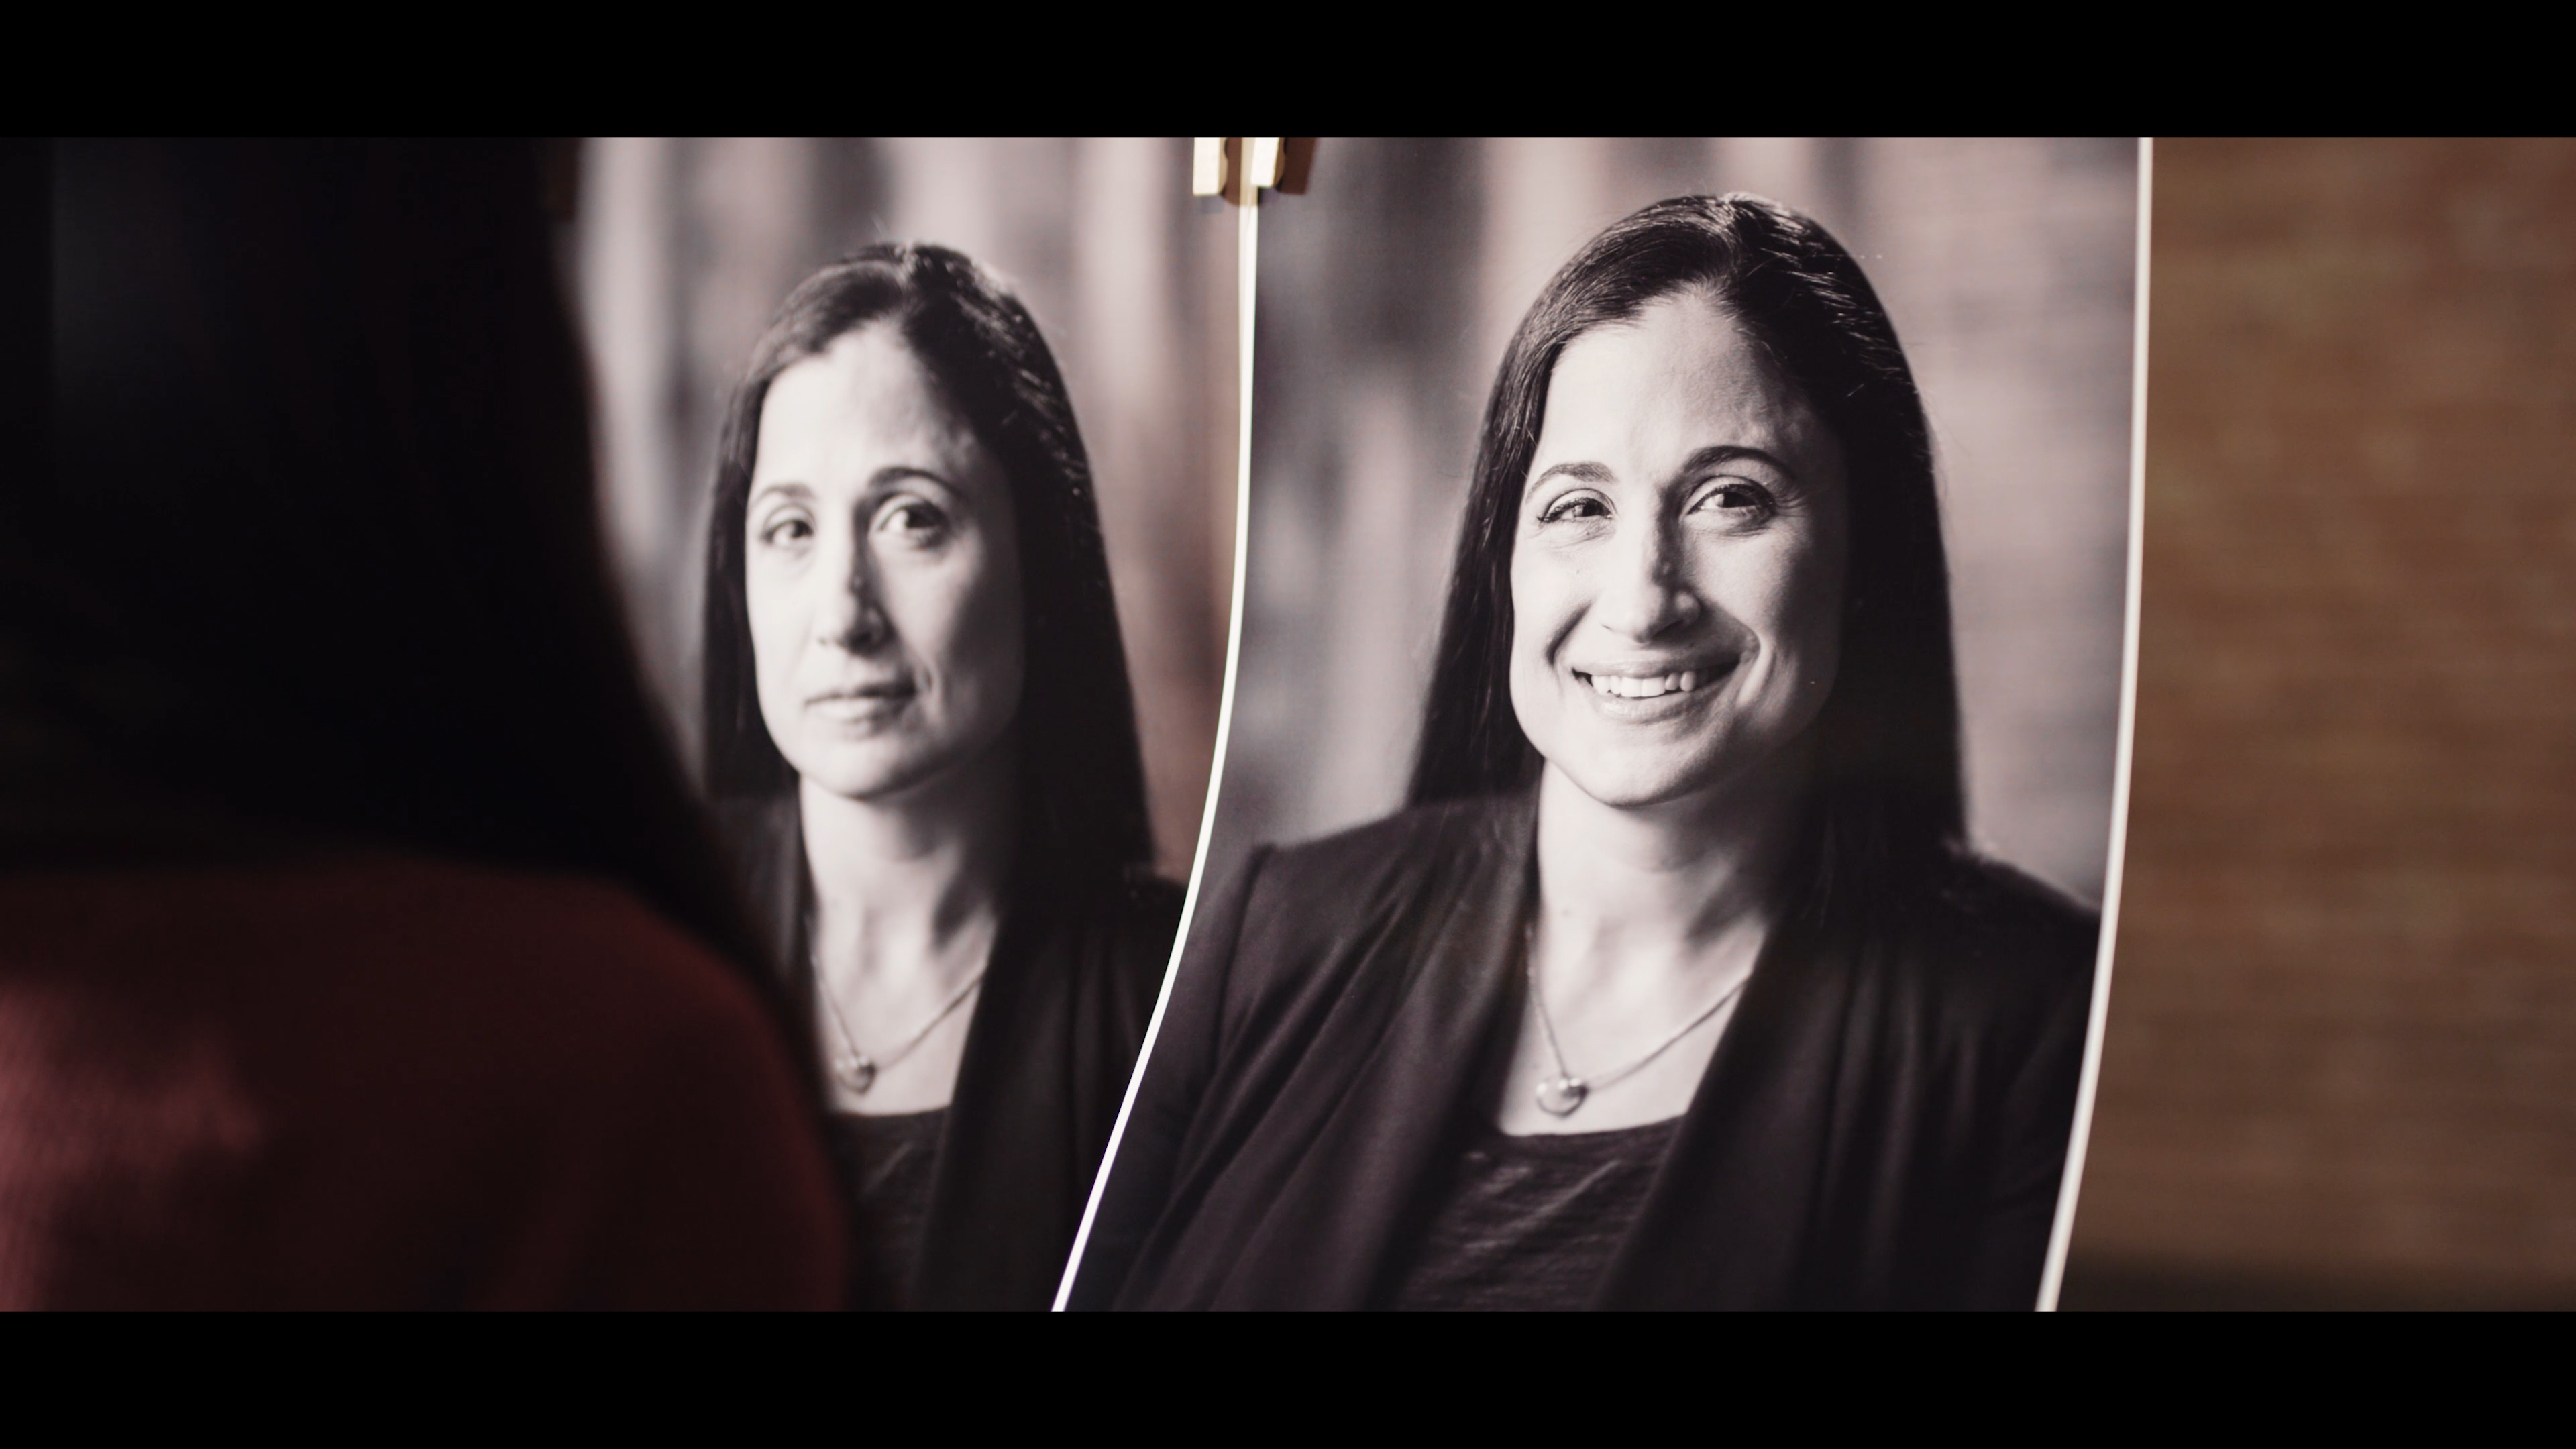
As far as product placement or branding goes, we didn’t want it to be an in your face ad, flashing a bottle of toothpaste and showing people brush their teeth. We wanted to create an emotion and subtly show people smiling and showing their pearly whites throughout the video. The only branding we included was the NuSkin logo at the very end, and the product placement was be done by the distributors (or salesmen) who were you going to be using this video to promote the toothpaste.
So always make sure to discuss with your client what the commercial is going to be used for and how it is going to be distributed. That way you can know what level of product placement will be most effective.
Now for this commercial we debated whether to hire actors or just pull random people off the street and try to make it super organic, but by the end of the shoot, I was very glad we chose to use actors. The reason being is because they just know how to present themselves on camera so much better, thus making my job so much easier as the cinematographer and editor. Not to mention we were able to hand-pick the right “look” giving us diversity of age, race and gender to align with the client’s demographic. And even though they were all actors, they didn’t know what questions we were going to ask and so the responses and emotions we captured were all real and organic, so it worked out great.
So when you have the budget, it’s definitely worth paying to have professional on-camera talent. You can have amazing cameras and scripts and lighting and concepts, but if you go cheap on the talent and just use your friends as actors, it can make the whole production feel cheap and unprofessional. So keep those points in mind!
Budget and Costs
Speaking of budget, we didn’t have a huge budget for this. The client gave us about $8,000 to make the whole thing come together. To give you an idea of where that money goes: about $3,000 of that went into hiring out 6 or 7 actors, $500 to rent out the location, $1,000 went to my producer, $1,500 I kept as my minimal day rate to direct, shoot, and provide equipment. And then I charged $1,500 to provide a full 4 minute edit, and a shorter 1 minute edit. We then also paid a few dollars for a make up artist, a sound designer, and other little things here and there.
Ideally we would have had a little more budget to work with but we made do with what we had and the client loved the end product and that’s always my goal, is to make the client feel like they got more value out of the video than the money they put into it, and I’ve found that they’re usually willing to provide bigger budgets the second time around, once they’ve seen what you can produce for them.
As far as the process goes for what it took from beginning to end to make this project come together, I was actually in San Diego on another shoot when I got the call about taking on this project, and they had a really tight deadline and wanted to shoot the following week. Since I was currently occupied with another client, I wasn’t going to have time to scout out locations and select actors and do all the pre production of planning and scripting out the concept. With these difficult circumstances, I actually hired my buddy Lance Lowry to produce this one for me, and that allowed me to continue giving my full attention to the client in San Diego, while having my next shoot all planned and ready for me to show up and shoot as soon as I got back home the following week.
As far as setting up the scene for this lets take a look at the set and see what I used.
Equipment, Lighting, and Scene Setting
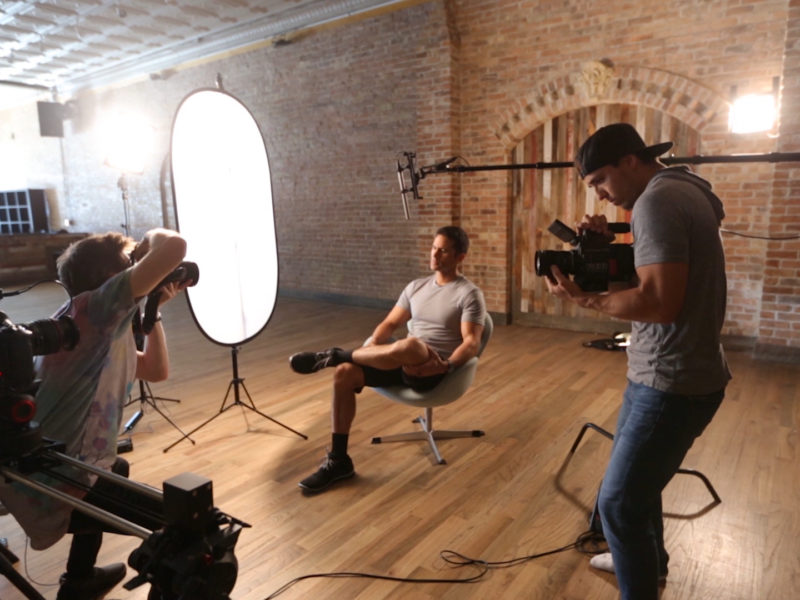
So first off, we have the wonderful Rhino Slider, which I used to slide my Canon 1DX with a 24-70 mm back and forth. I don’t normally use these sliders a ton in shoots, but proved to be extremely helpful in the hyper lapses that I filmed, and ended up using in the final product.
I actually ended up doing most of my shots handheld to allow me to get some super close up shots of the subject’s eyes and smiles, etc. The camera I used to get handhelds was the Red Dragon on the Sigma 50 mm.
In terms of lighting, we had the Westcott Flex Kit. I chose to shoot that light through a 5×1 pop up reflector to diffuse the light coming in on the subject. When we use these pop up reflectors in front of a light, it gives off a nice soft light on the face of our subject. Now if we compare that same light with and without the diffuser, this is the effect it will have on the human face. You can see that it is super hard light on the face that has super cut and dry shadows so much to where you can see exactly where the shadows are starting and ending.
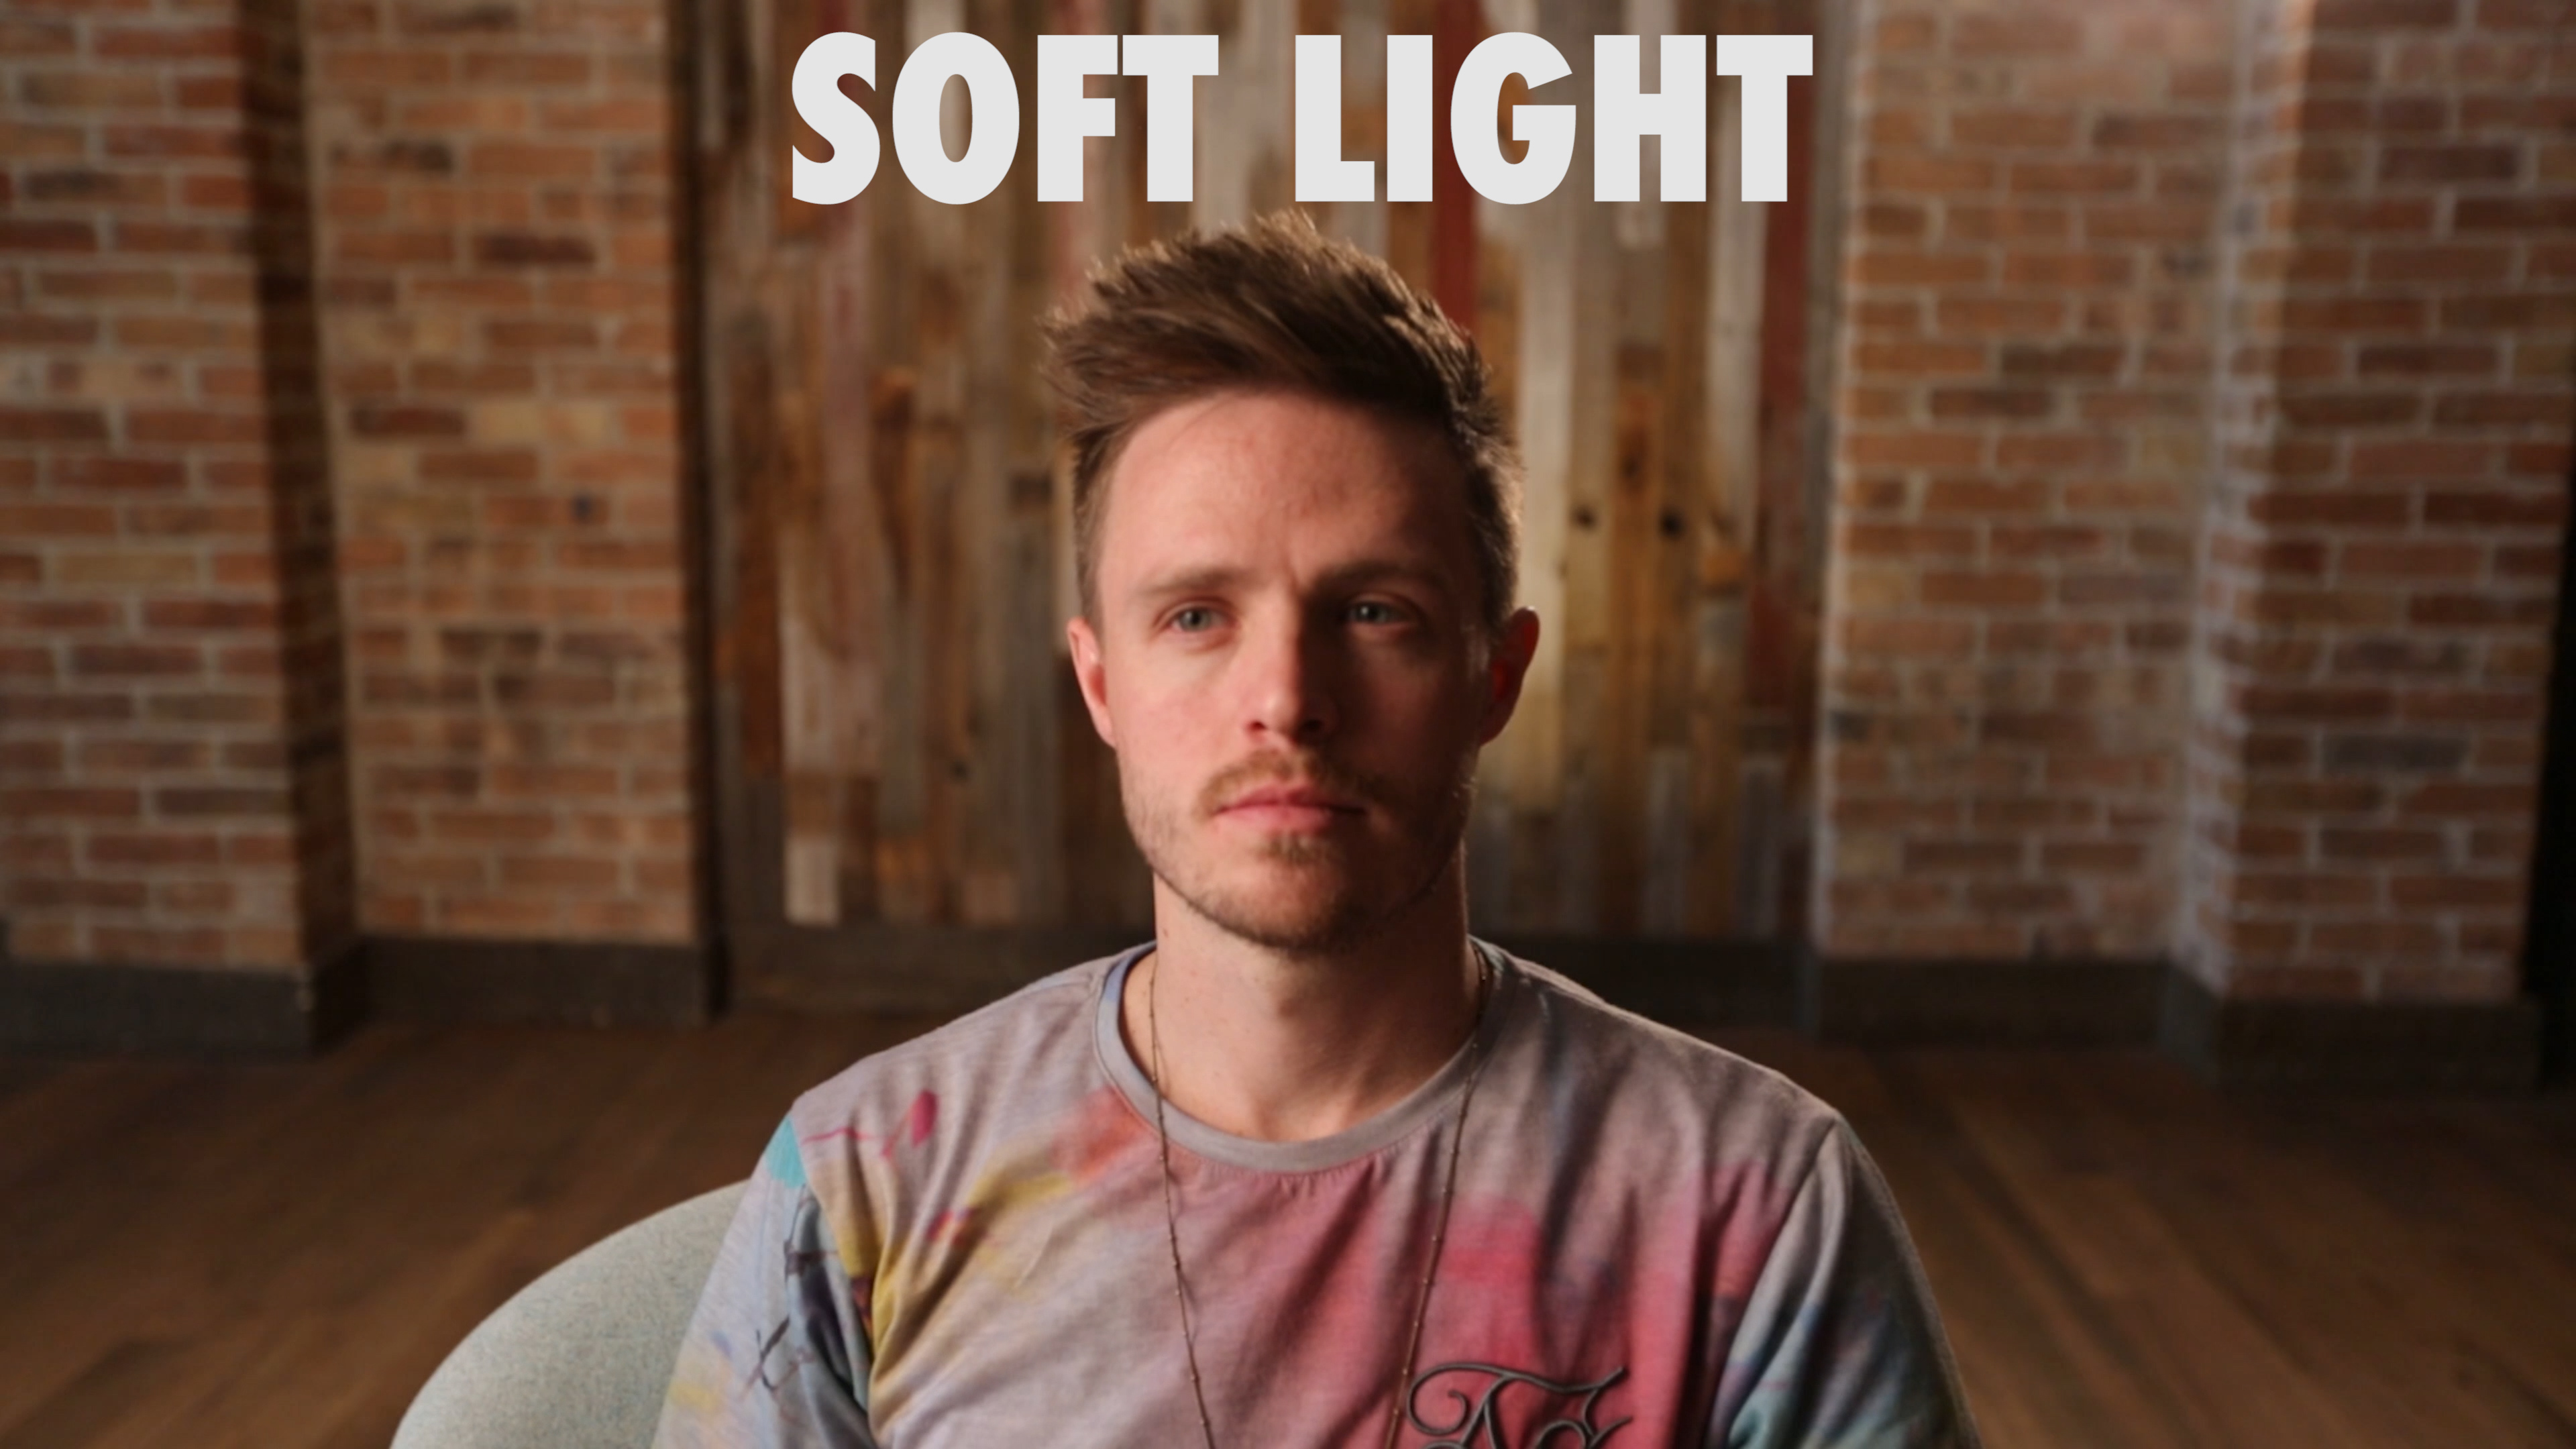
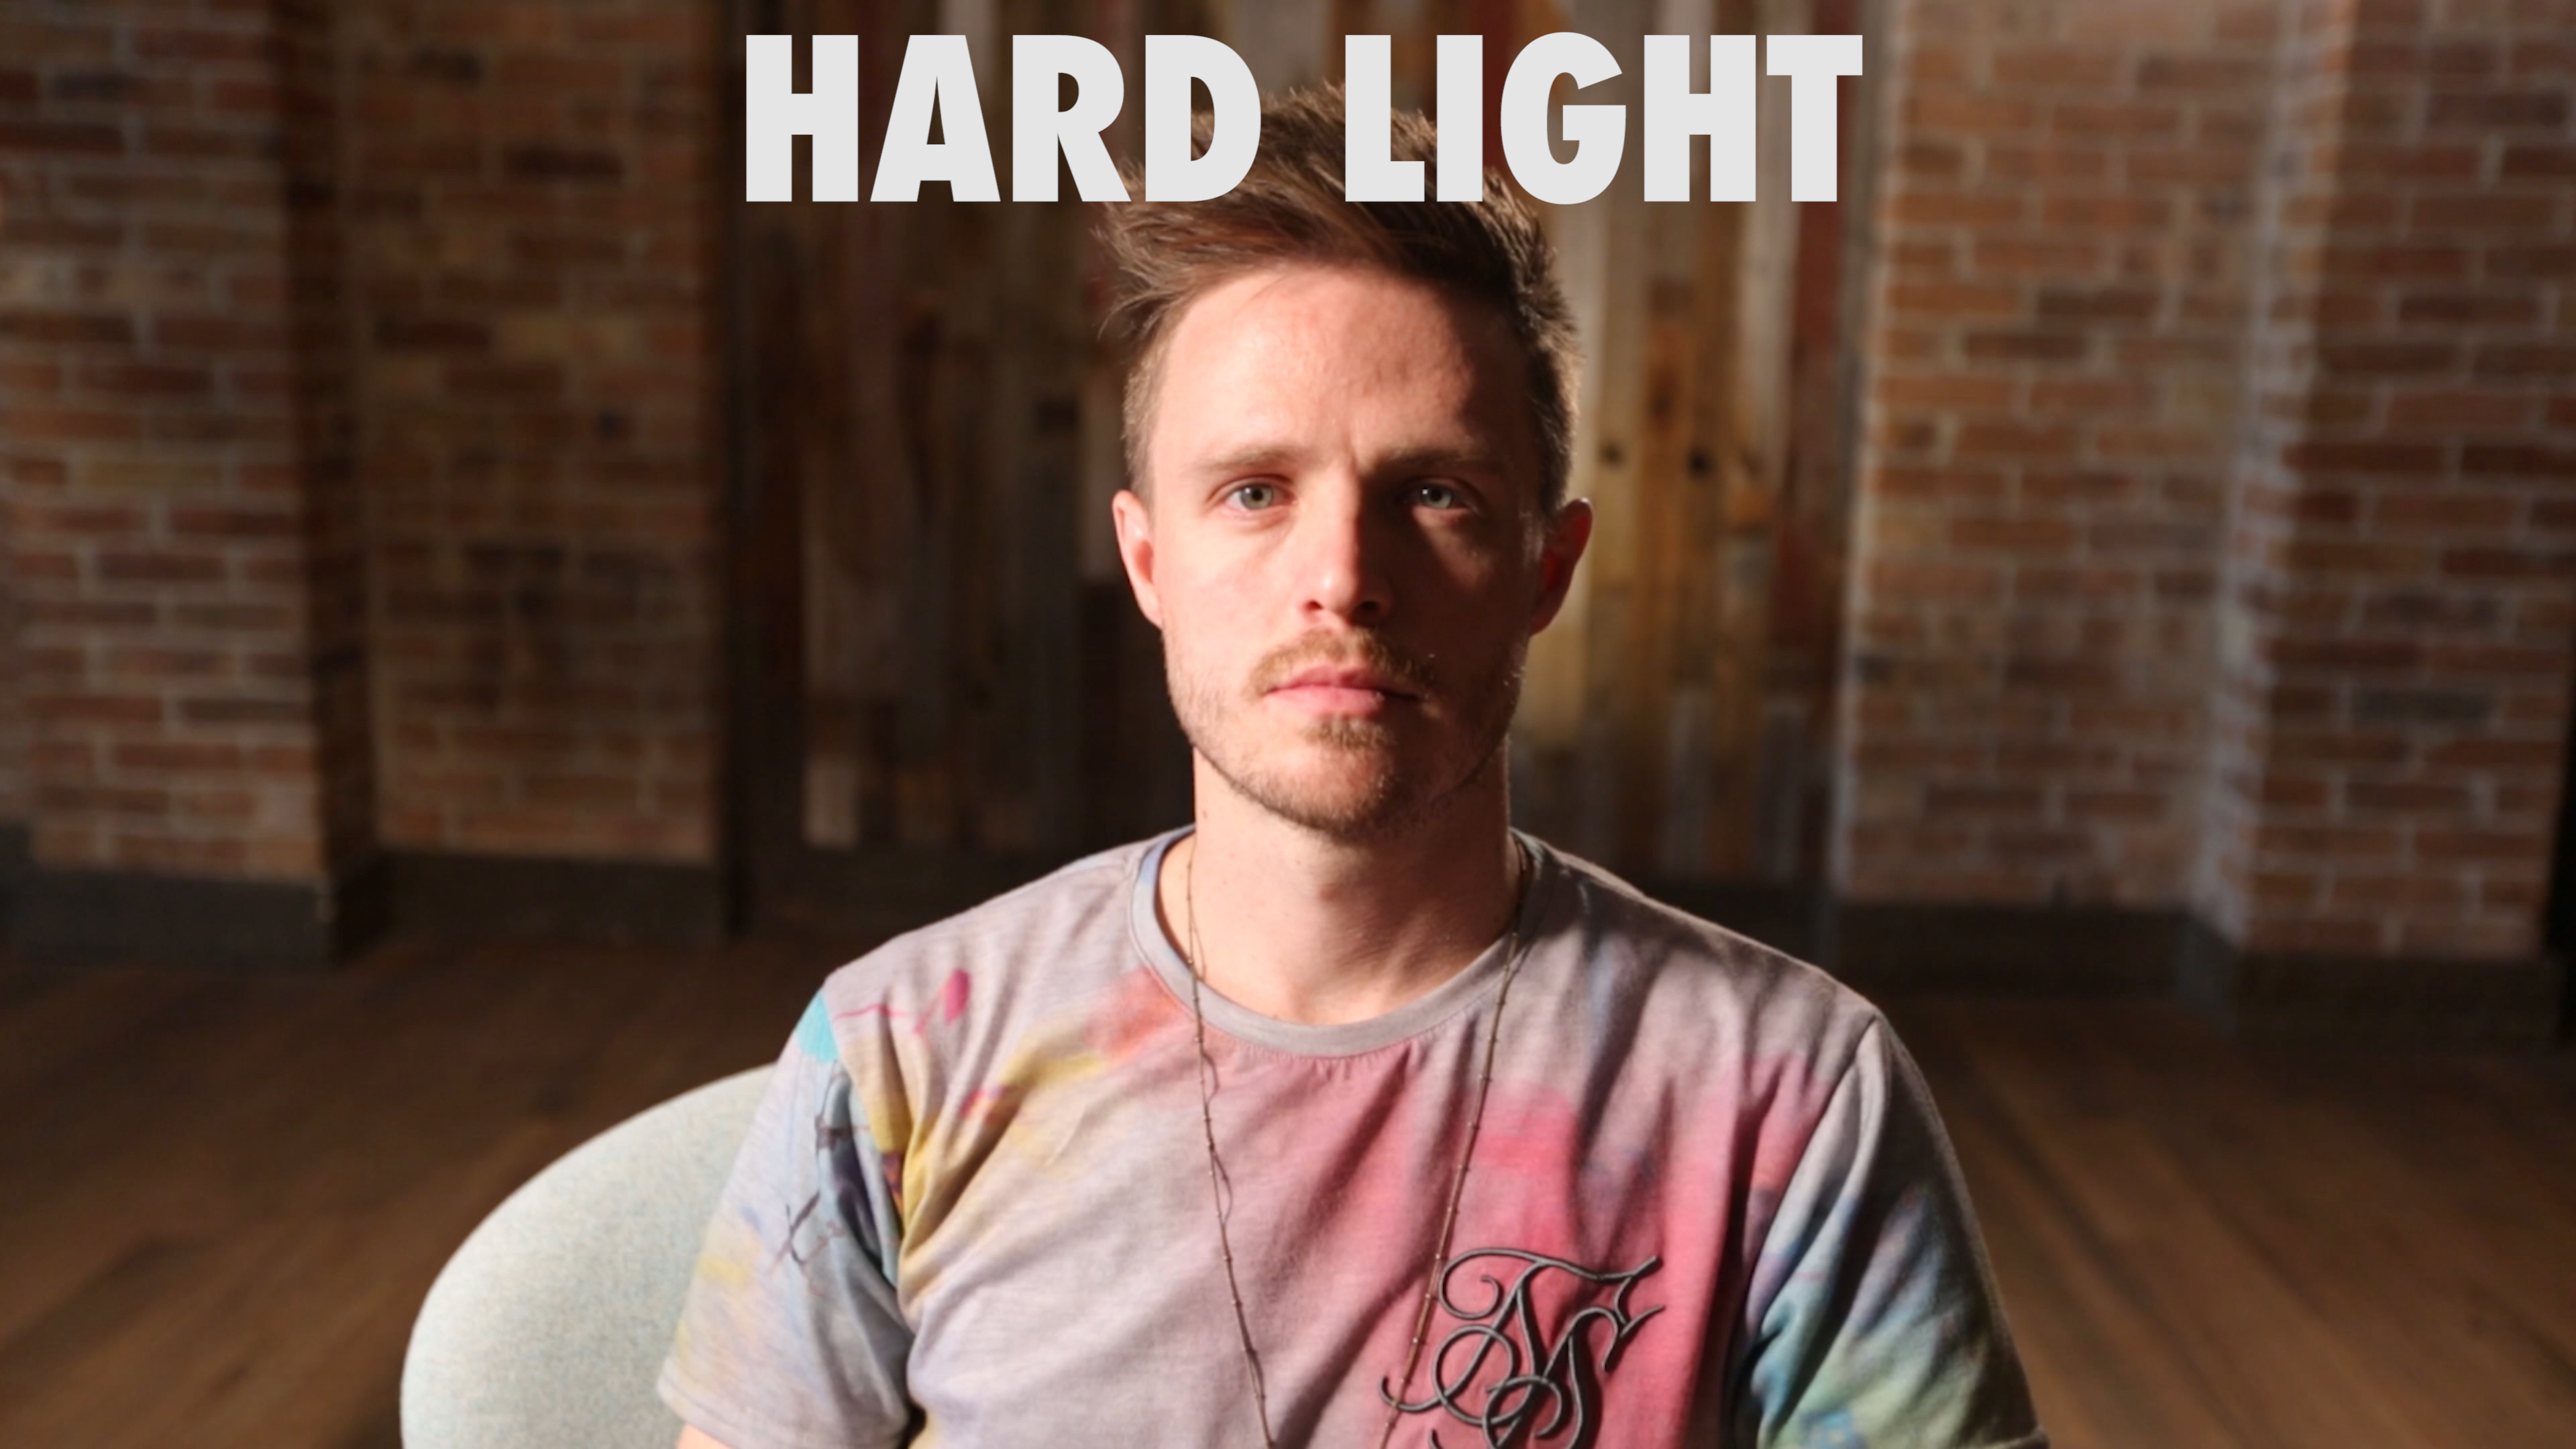
All that diffusion is doing is making the light look more flattering and softer on the face. Not everyone has perfect skin, and the harder light you use, the more detail of the skin it is going to bring out.
Then in the back of the room we GAF taped a second Westcott Flex Kit to the brick wall, and may I say these Flex Kit lights are AWESOME!
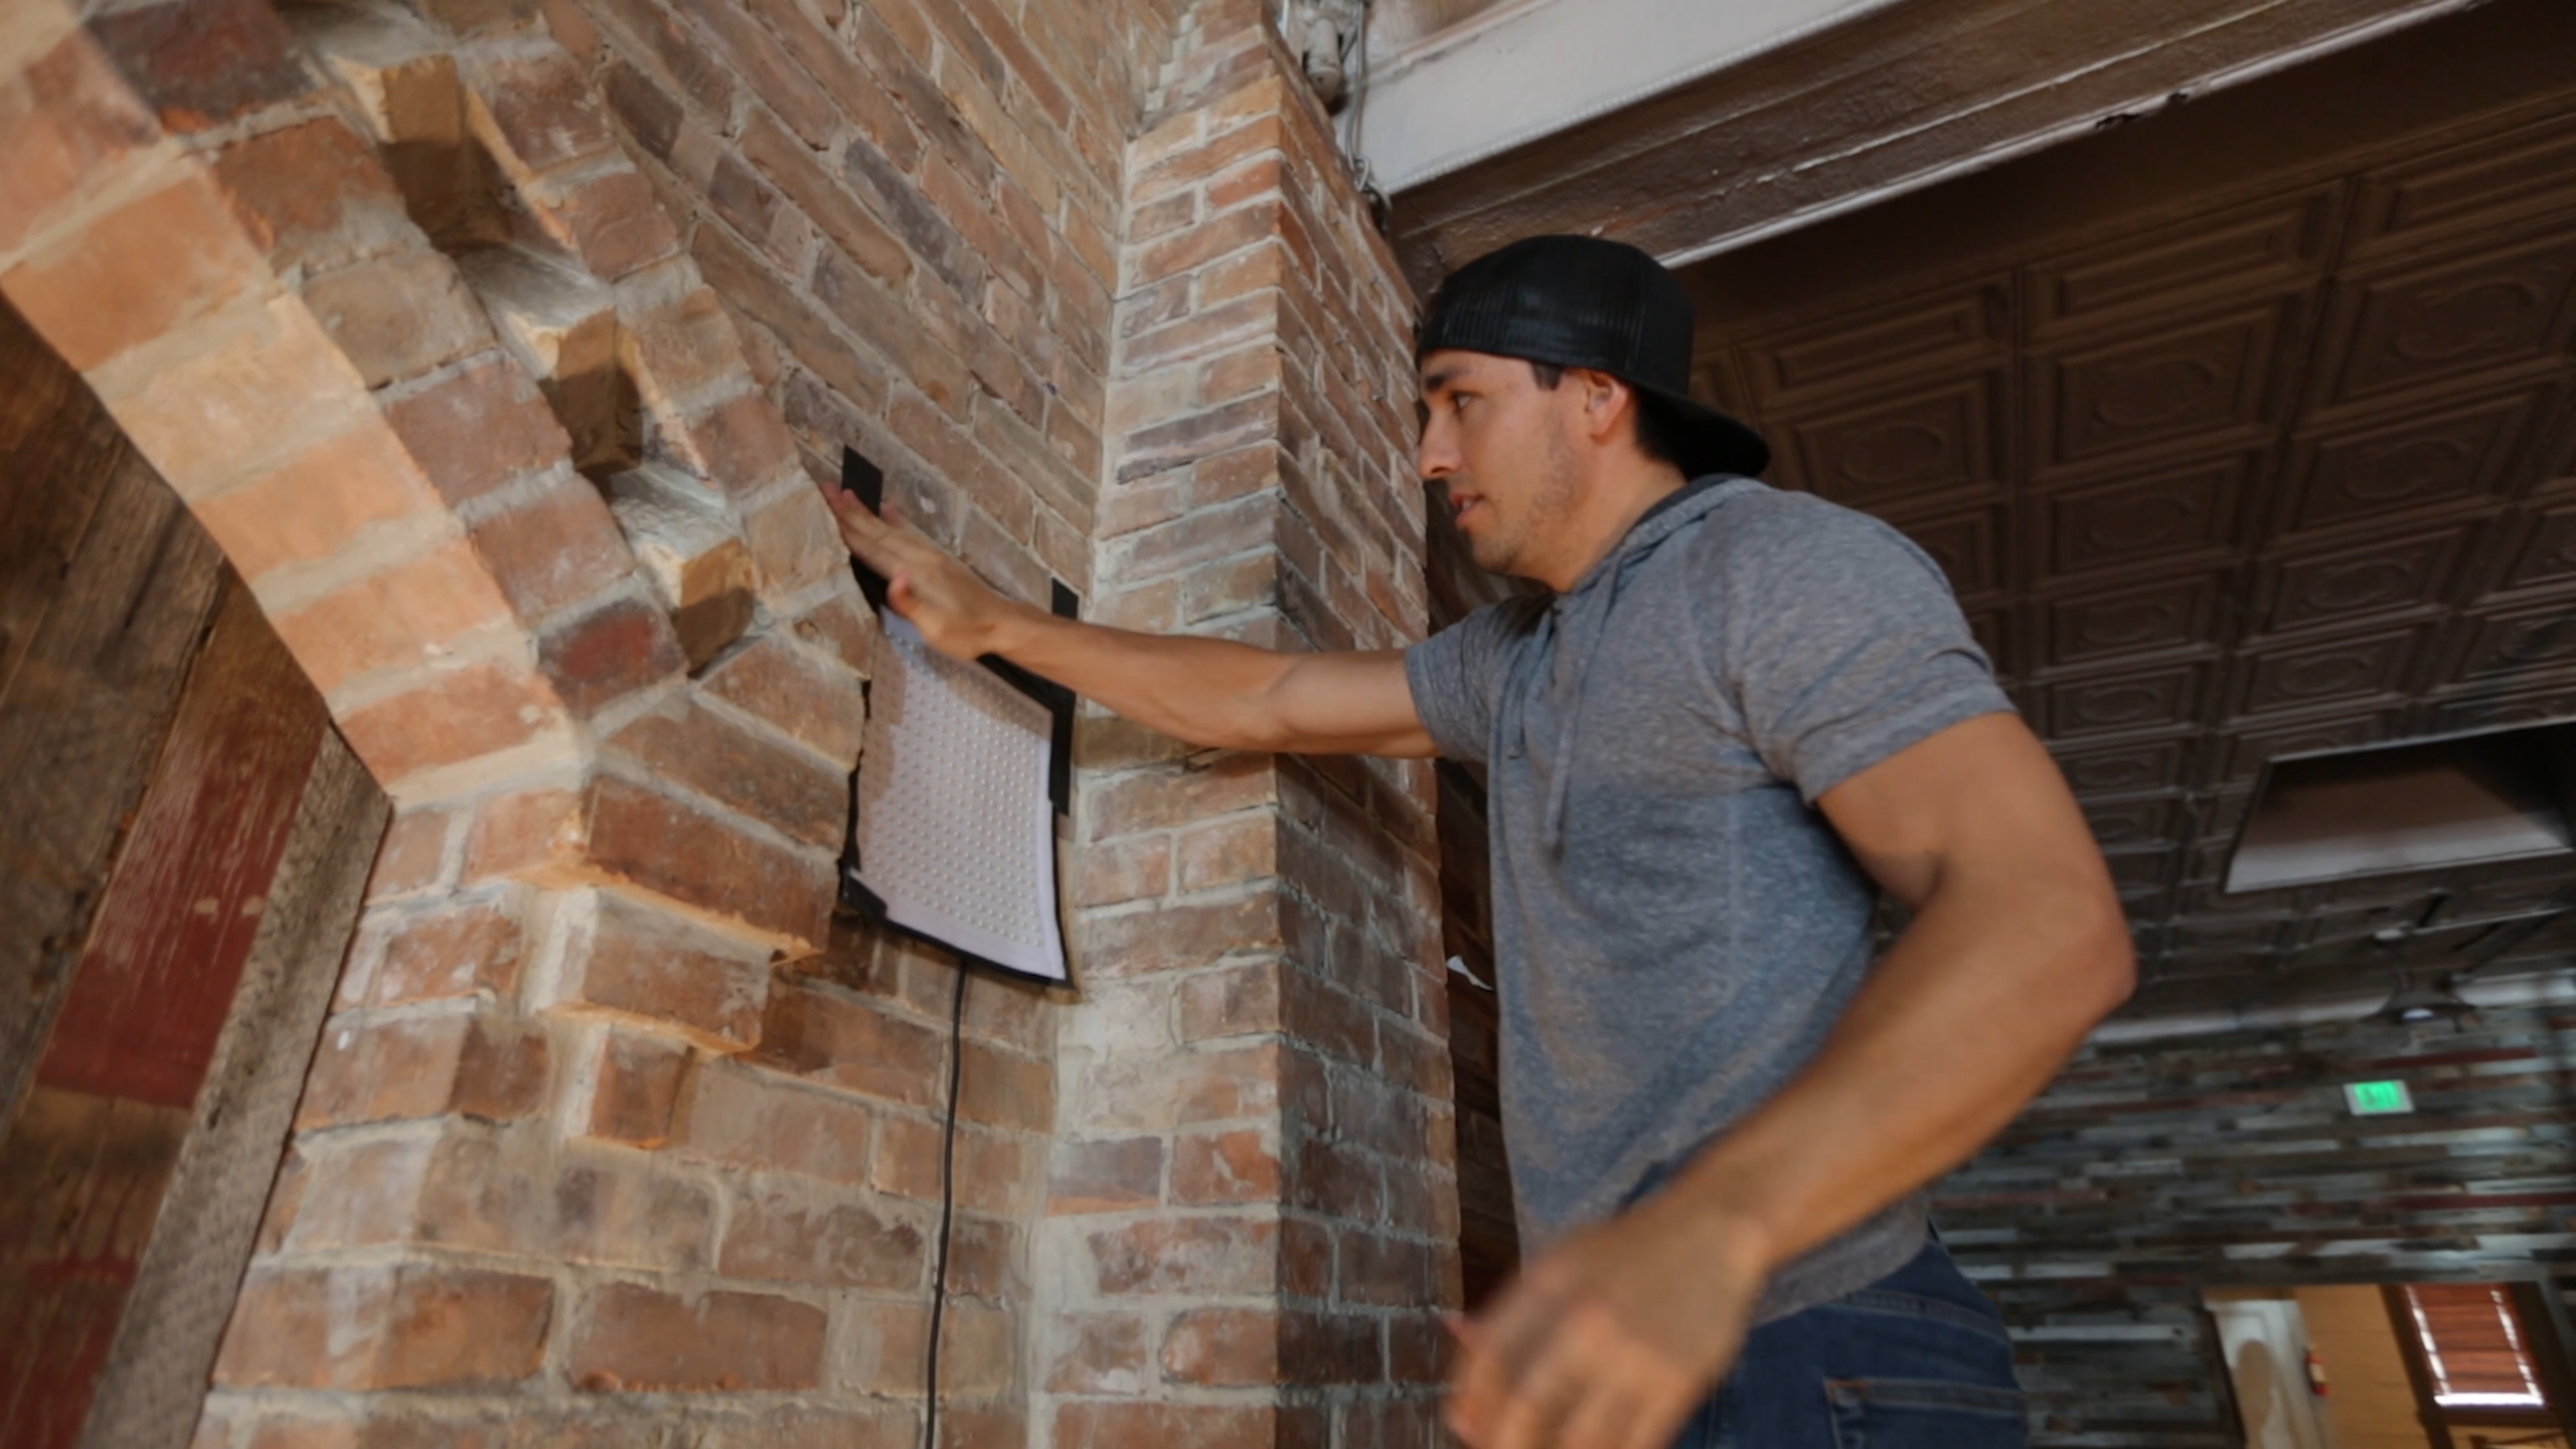 We originally had the light attached to a light stand, but because it was showing in our shots we resorted to taping it on the wall due to the awesome flexibility and easiness of setup of the Westcott Flex Kit.
All of the actors were situated in a way in relation to the lights to create what we call “Rembrandt Lighting” (see the Cinematic Lighting Tutorial for in-depth details and step by step on how to set up lighting for professional, cinematic lighting)
The Rembrandt lighting method is super popular in Hollywood films and when the subject is being lit in a certain direction, creates a triangle of light on the opposite side of the face: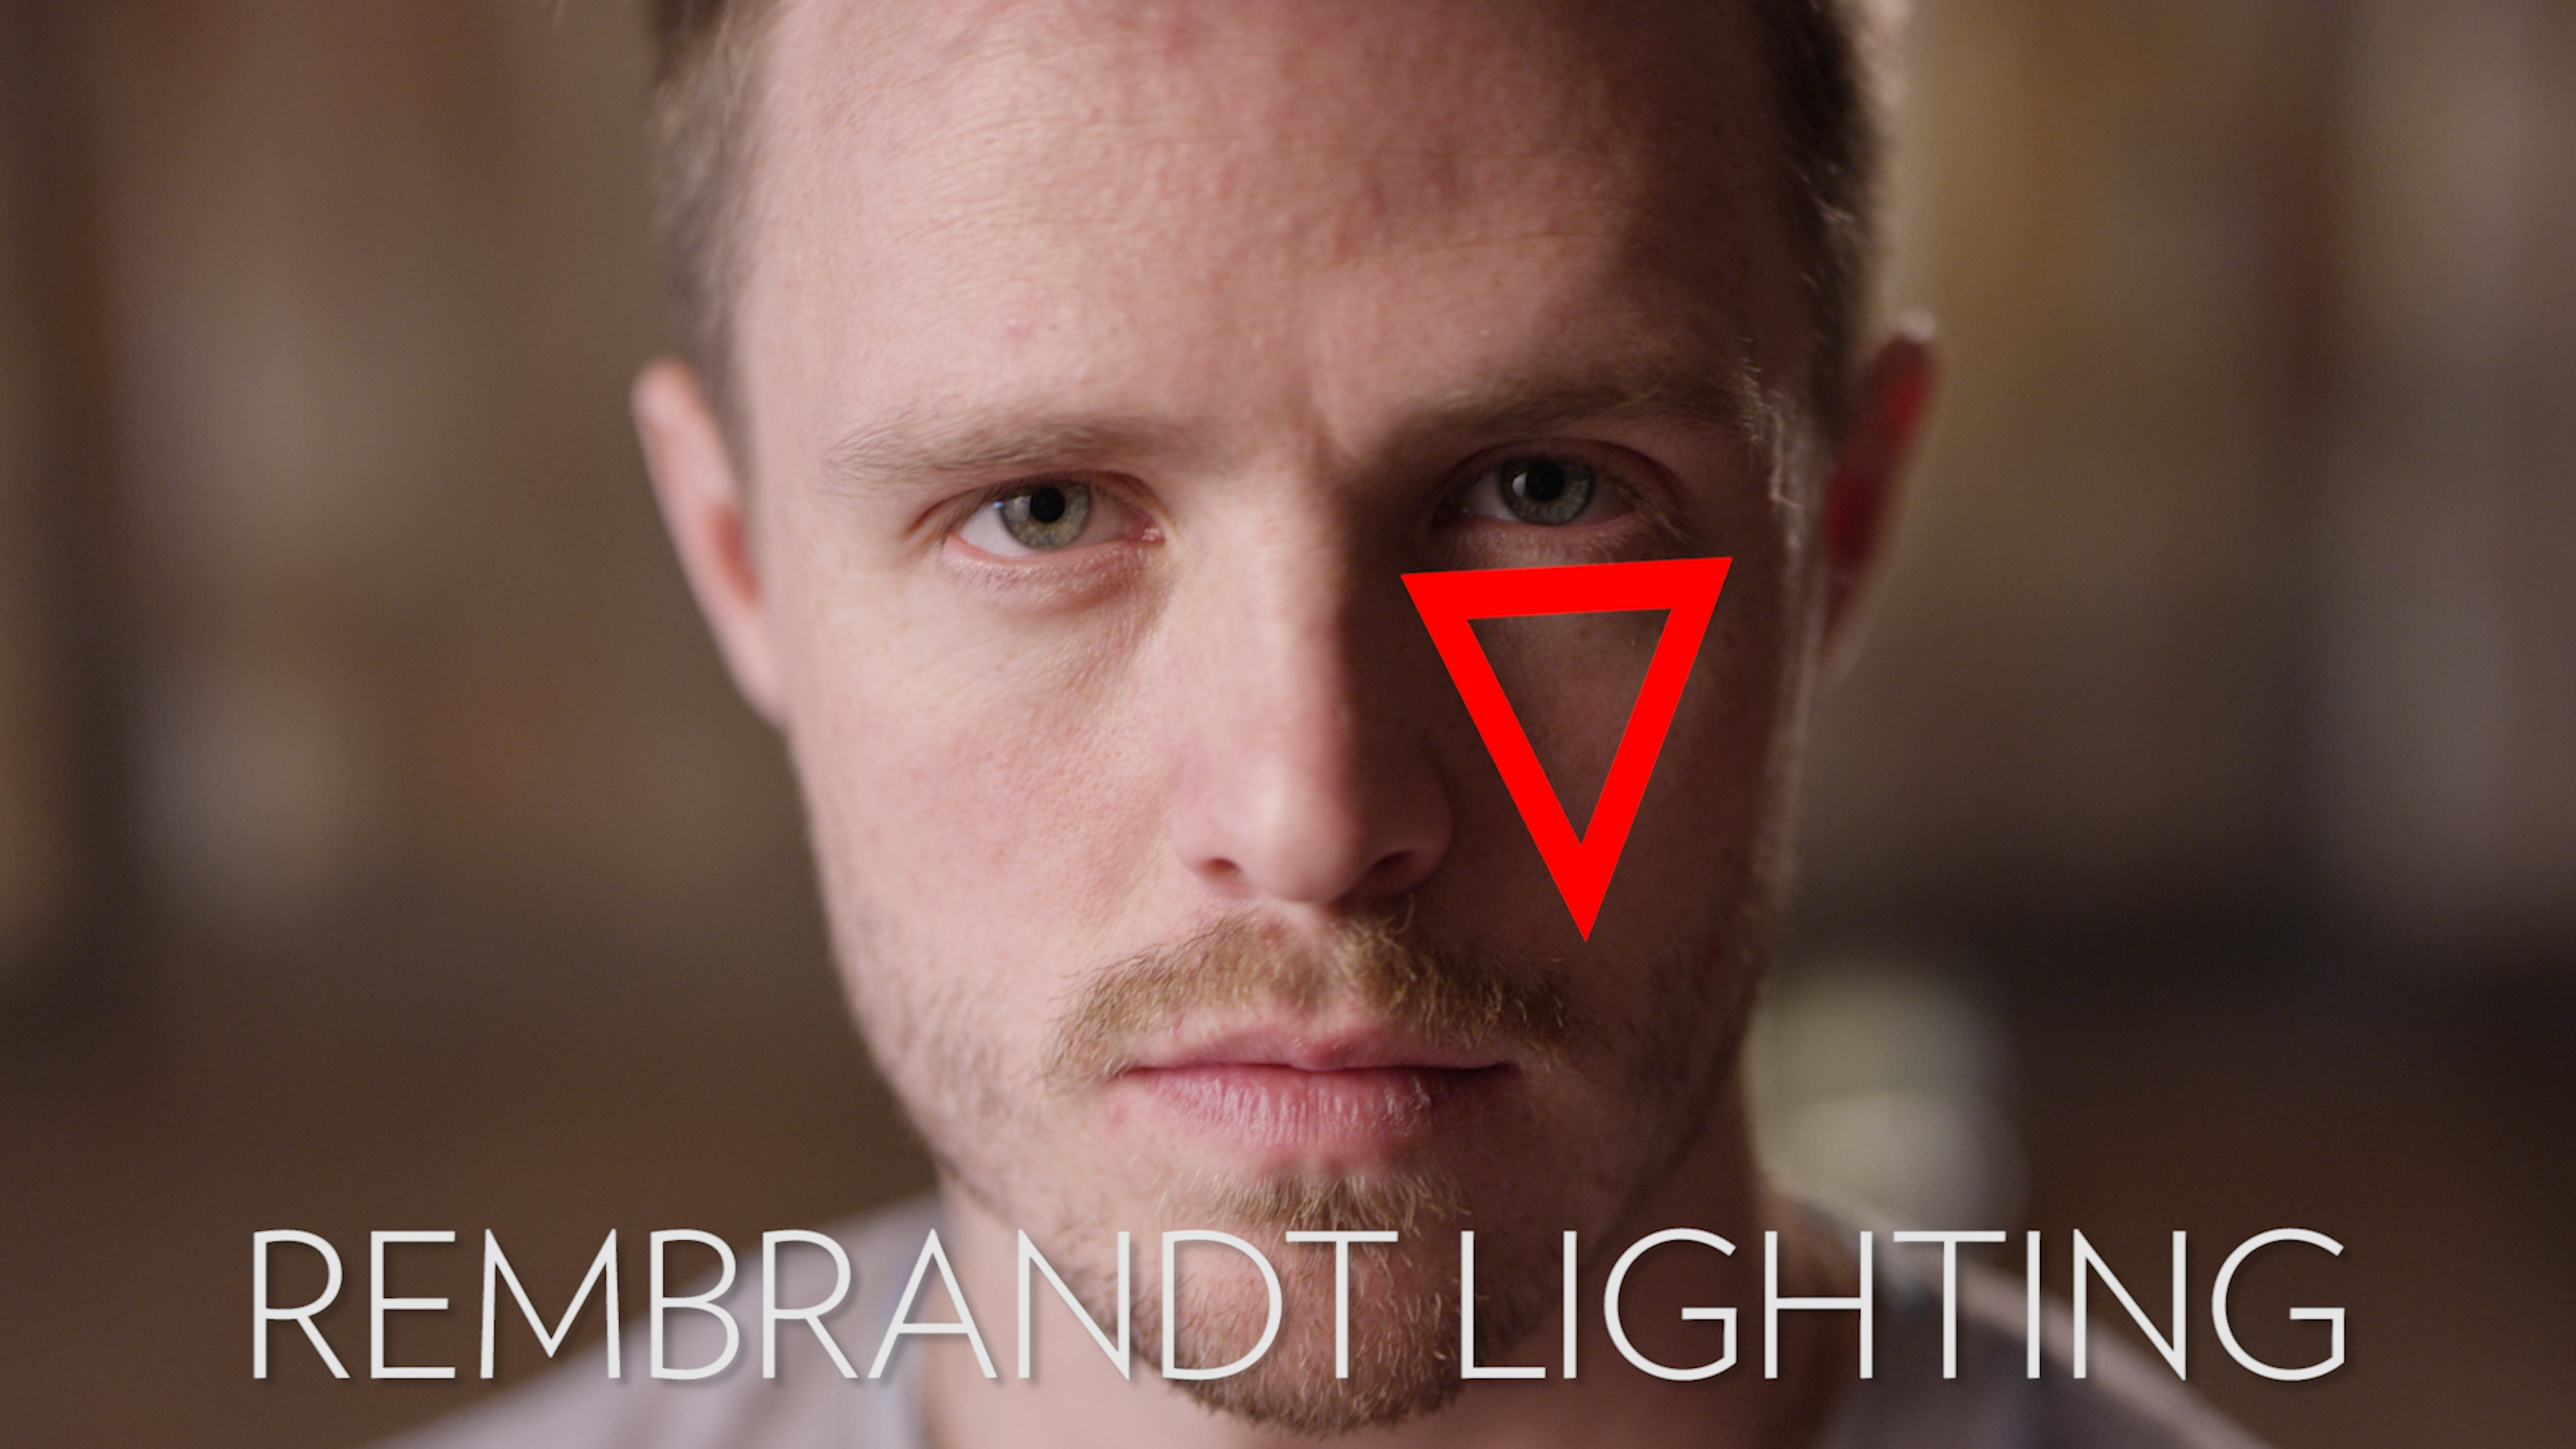
This creates an appealing contrast on the face, and an attractive glow coming from the backlight on the back of our subject.
Another composition of light that I go over in the Cinematic Lighting Tutorial is what we call a “Catch Light”. This causes a light reflection to be shown in the human eye making the eye pop out and look more attractive.
To pick up some clean, crisp audio I chose to shoot with the Rode Mic and also used a backup LAV mic. In this shoot, we actually forgot to roll audio with the Rode Mic, but because we had the actor also hooked up to a LAV mic, we still had audio. So always shoot with two sets of microphones!
So there you have the basics of how we set up the scene for the this shoot, now I just want to go a little more in depth about some of the creative choices we made.
Going back to the lighting, I want to reiterate that I was able to pull off this entire shoot with just 2 LED lights. The Westcott Flex 1′ x 1′ Bi-Color 2-Light Cine Travel Kit is the exact kit I used for this shoot, highly recommend it, and you can check it out in the link embedded here. But the point is, you don’t need a huge expensive truckload of lights to pull off great lighting. I also want to point out that we had natural light flowing in from the windows, and since daylight’s color sits at about 5600k, this gave us an awesome color contrast in the background, as it offset the 3200k LED lights. Color contrast, as I’ve talked about before, helps create more depth to your image, making it more cinematic.
Going back to the handheld look, I normally shoot most of my videos with glide cam to give my shots that smooth buttery look, but for this one, I wanted it to feel more organic like I was a fly on the wall, just documenting a social experiment. So I chose to go hand-held on this one with my RED Weapon and 50mm Sigma Art lens. The reason I chose the 50mm is because it is the focal length that most closely replicates what our human eye sees, so it’s a great lens to help your viewer feel like they are in the room and that the lens is acting as their eyeballs; watching everything take place.
Also, When shooting handheld, you have to be careful not to get TOO shaky with the camera movements, or else it just becomes disorienting and makes your audience feel sick. So what I do to avoid this is I keep the camera tight against my body, with my left forearm underneath the camera, my left hand pulling focus on the lens, and my right hand firmly holding up the camera by the top handle.
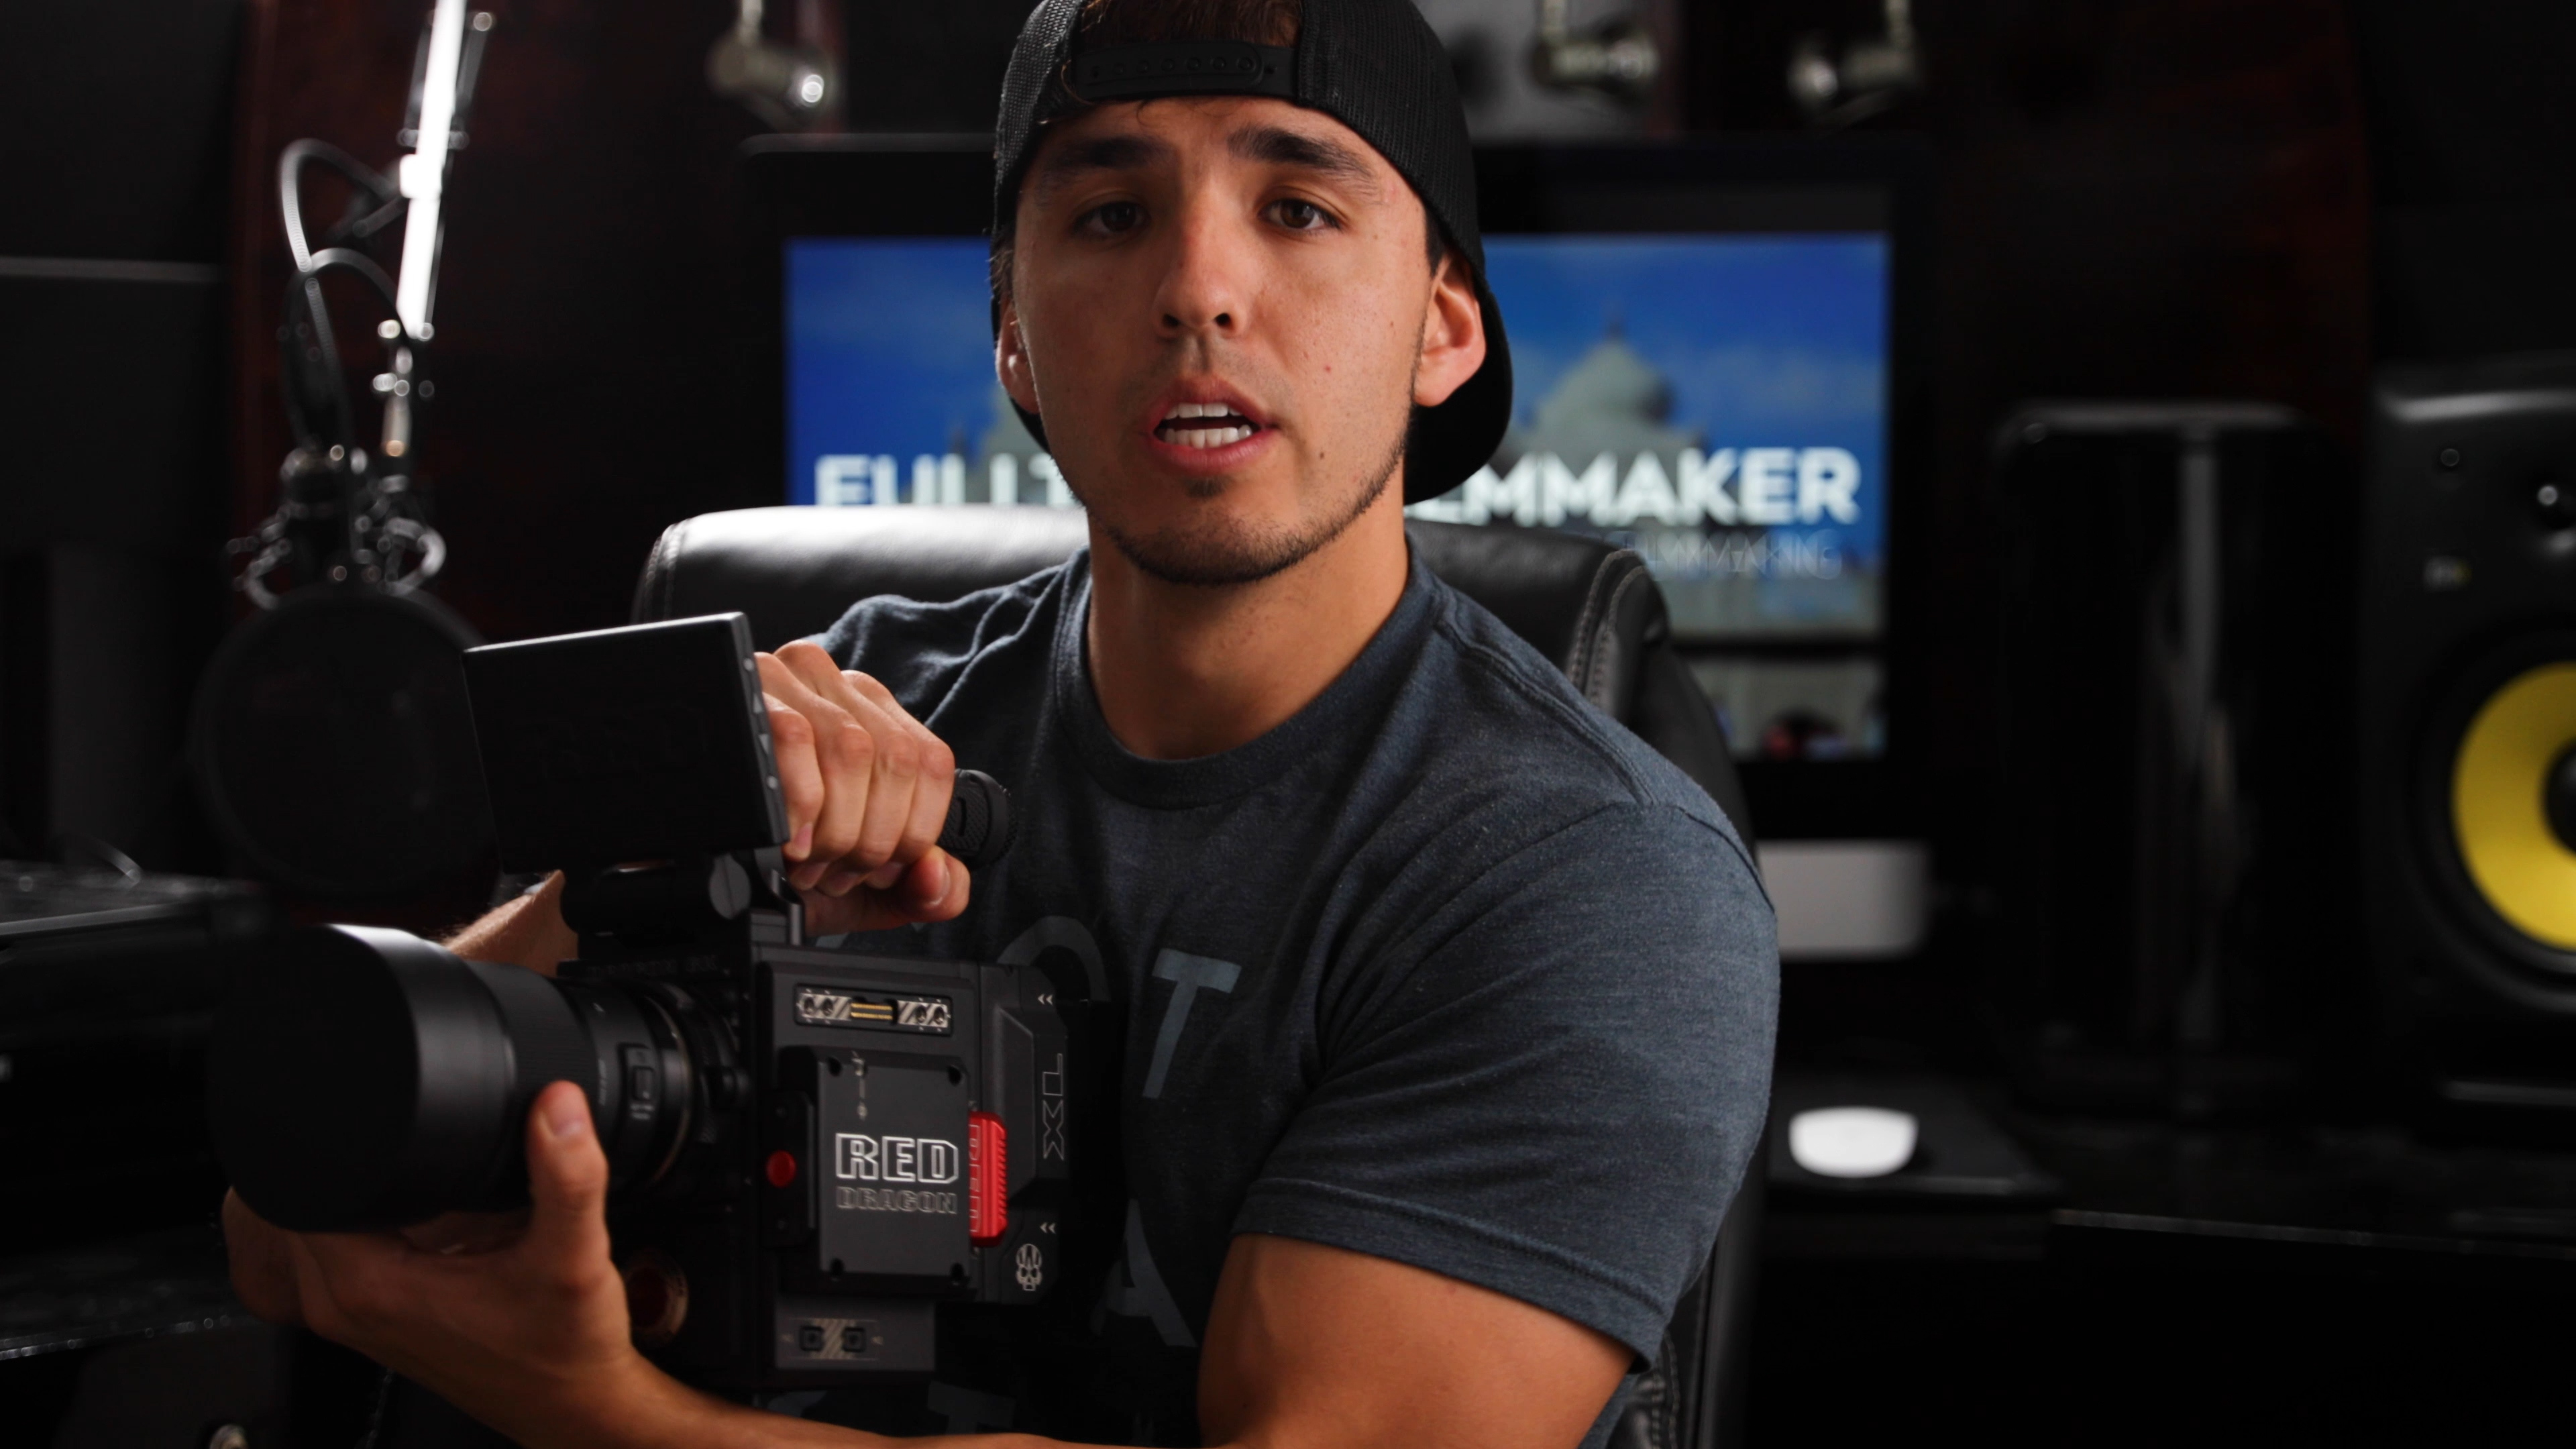
That gives me 4 points of contact, keeping the camera stable and making my movements smoother so that the shaky handheld look isn’t overdone.
There were also a few shots in the final video from my Rhino Slider, but the coolest ones came when I set my slider to time-lapse mode and had it slide the full 4 feet over 5 minutes with our 20mm Sigma ART, giving us a perfectly smooth sliding time-lapse. So that is an awesome feature of the Rhino slider! Quick FYI is that all full time filmmaker members get 10% Rhino sliders, refurbished glidecams, and all Westcott lighting gear.
Camera Settings and Post Editing
Now as far as settings go, I wanted a super shadow depth of field for this video so I shot the whole video at a 1.4 aperture, my shutter speed at 1/48 of a second, and my ISO at 800 (which is native for the RED).
My frame rate was at 24fps for most of the shoot, except for some B-Roll shots that I wanted in slow motion, I shot at 82fps (which is the highest frame rate that the RED can shoot at 6k), and then I slowed that down to 24fps in post editing. Speaking of post editing, this shoot was easy to cover as far as just filming interviews and grabbing a few B Roll shots as we went along to help tell the story. However, most of the story telling happened in the editing room when I had to condense over 2 hours of interviews into just a 4 minute and a 1 minute edit.
And to make my life easier syncing up footage from the cameras and audio inside premiere pro, I use the software Plural Eyes by RED Giant, which costs $300, but Full Time Filmmakers get 50% OFF so I was able to snag it for only $150. Honestly speaking this software is a lifesaver! It perfectly syncs everything up (all my different cameras and audio sources) for post editing, which saves me hours before every project, so definitely worth the money.
And then once everything is synced up, I’ll usually do 3 or 4 rounds of sifting or cutting through the footage, narrowing it down to usable footage and eventually piecing it together to tell a story. This process probably takes about 10-15 hours, but is super important to make sure you clearly get your message across in the least amount of time as possible. So I originally cut it down to about a 5 minute video, and then the client wanted it shorter, so I omitted pieces here and there that weren’t intriguing to the story, and was able to get it under 4 minutes. Then, once I had finished the 4 minute edit, I had an even bigger challenge of creating a clear message in just 1 minute for an instagram ad!
So I’ll provided a link to go watch the full 4 minute ad for those of you who would like to see the final product! But that’s basically it for my process for shooting a commercial, hopefully that gives you some good insights that can help on your next shoot!
To check out more virtual job shadows like this, and take advantage of awesome student discounts on gear and software, check out fulltimefilmmaker.com, take a look at these other extremely helpful videos I have included at the bottom of this article! If you have any other questions please let me know!

